


For this project, you’ll need to make or obtain a box for your room. If you have basic woodworking skills (or you’re willing to learn them for the sake of minis), you can do this with a minimum amount of tools and skills.
My method of choice is making pocket holes, which allow you to join pieces of wood at right angles using something called a Kreg jig, which is an inexpensive tool available at most home improvement stores.
Here’s a short video to see how this works.
And if the above video seems a little too vague or fast paced, if you use it in combination with the guide that comes with the Kreg jig, you should be good!
I used leftover ¾”-thick poplar from a previous project. The board was already 11 ⅜” wide, so I used that as one of my dimensions. I cut my room pieces in the following dimensions:
Floor: 8” by 11 ⅜”
Back wall: 11 ⅜” by 8 ¾”
Side wall: 8 ¾” by 8 ¾”
All but one of my pocket holes were made in the floor, since this would make it easy to conceal them with tile in a later step.
I used leftover paint from our living room remodel on the walls (Valspar interior flat in Pinkwash). You certainly don’t have to use actual house paint for this; any acrylic craft paint will do just fine. Make sure to tape the top and side edges of the walls before painting to get a nice, crisp line.

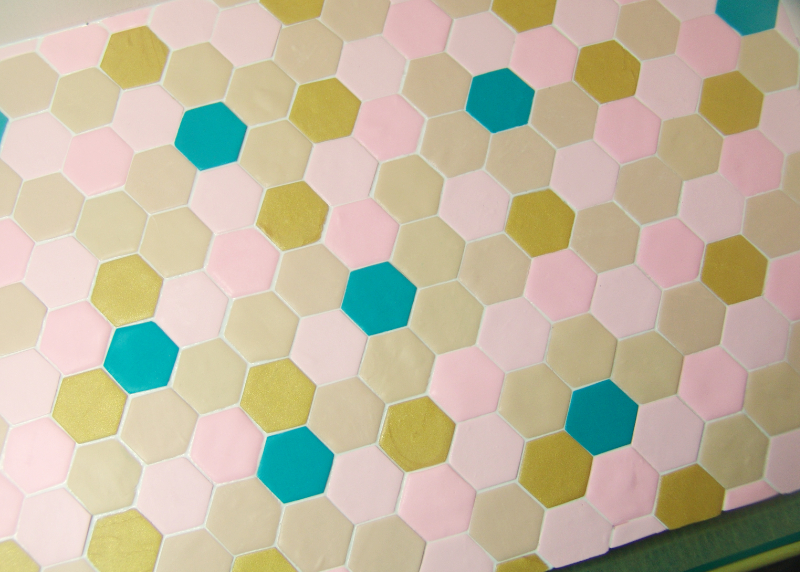
Then, I used Sculpey’s Hexagon Mosaic Cutter to create an assortment of tiles.
Colors used:
Sculpey III in Beige, Ballerina, Teal, and Jewelry Gold
CraftSmart in Rose

Roll the clay colors of your choice into a sheet of even thickness (a pasta machine works well here), cut, and bake the pieces on a ceramic baking tile.
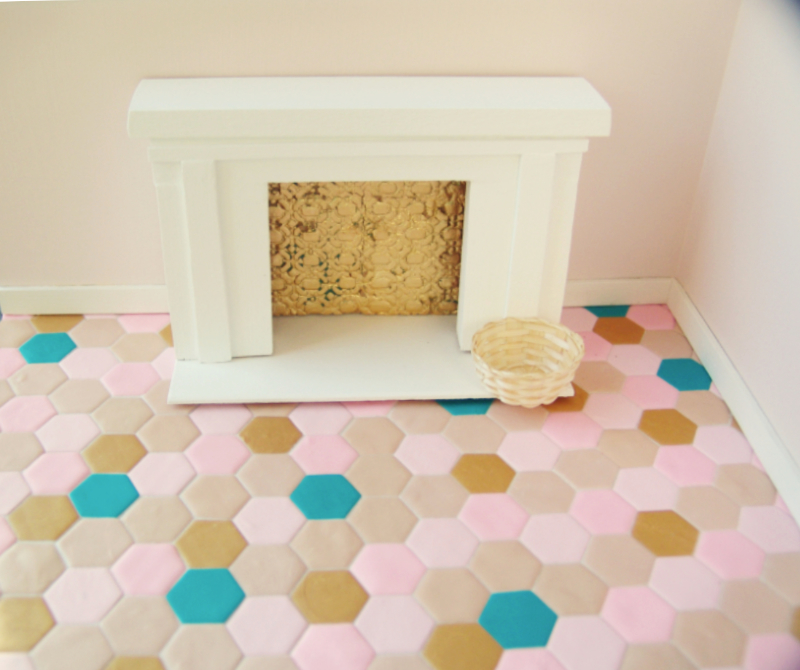
Arrange the tiles without adhesive first to decide on the pattern, trimming any tiles as needed to fit the footprint of the room. Then, use E-6000 or a similar adhesive to secure them in place.
While you might find another method that works best for you, I tiled my floor by working from the back corner outward, and I glued down all of the tiles that fit completely, without any overhang. Once those were dry, I was able to tip the room on its side, which allowed me to place a tile in one of the open spots near the edge, trace a line on the underside of the tile where it extended beyond the floor, and cut to size. For the inside edges, you’ll need to use a ruler to measure the unfilled space and then cut your tiles to suit.
Once the adhesive was completely dry, I used a ceramic tile caulk to fill in the gaps. Follow the instructions for whichever brand caulk you’re using. On a real floor, you’d be using grout between the tiles, but at this smaller scale, the gritty grout can be harder to work into the cracks, and the creamier caulk is quite nice to work with. Deposit some caulk on the tiled surface, working from the back corner, out to the edges, and use a metal spatula or spackling knife to spread the caulk over the floor, making sure to work it into the tile gaps.

Immediately use a damp cloth to wipe away excess caulk. You’ll likely have to make a few passes, rinsing and wringing out the rag in between. Let the caulk dry according to the manufacturer’s instructions.
Can we take a moment and enjoy the sheer cuteness of this floor?? Just think of all the possibilities with different colors and tile patterns, and even using tools like Sculpey Silk Screens to add intricate designs. Oh, how I love miniatures, where virtually anything you can imagine is possible. 😉
November 28, 2019 at 4:38 pm
Love this, love hexagon, love this site!
November 28, 2019 at 5:42 pm
Thank you, Nancie! 🙂
November 30, 2019 at 9:46 am
love this tutorial, gave me a great idea for the flooring for my room box, I intend to make a Victorian kitchen next year, and this will be very useful to know, plus it will work for wall tiles, as you the possibilities with these is endless. by the way love your blog and the work you do.
November 30, 2019 at 1:56 pm
Oooh, your Victorian kitchen idea sounds fabulous! Thanks for reading. 🙂